Playbook
Book AI Appointments on the Assigned Agent's Calendar
When your AI books an appointment, it should land on the calendar of the agent who owns that lead. This is the setup Victoria Cabrera showed on our Friday open mic, written as a step by step build you can do without any coding. Or paste one prompt into Codex and let it do the setup for you.


15 min read
Don't make your AI guess which calendar to use. Write the right one on the contact. You add two fields to every contact, Sales Rep and Calendar ID. A workflow fills them in the moment a lead is assigned, and fills them in again whenever you reassign it. Your AI reads the calendar ID and books there. The fastest way to build it is to paste the prompt below into Codex. If you'd rather click through it yourself, there are seven steps and each one ends with a check so you know it worked.
What you'll have when you're done
Right now, when an AI caller or chat agent books an appointment, it usually lands on one shared calendar, or on whichever agent happens to be free. That's a problem if your leads belong to specific agents. When you're done with this guide, every appointment your AI books goes on the calendar of the agent that lead is assigned to, automatically, whether you have 3 agents or 100.
Victoria Cabrera walked through this on our Friday open mic on September 25, 2026, inside the Tech Savvy Insurance community. She built it for an agency with 12 or 13 agents at once and called it a "$10,000 gold nugget," because multi calendar booking was the biggest problem she hit in years of building AI callers.
This works for Medicare, P&C, life, or any team where leads belong to a specific person. It works with AI that calls and AI that texts.
Before you start: a 2 minute checklist
- Admin access to your GoHighLevel sub-account. You need to be able to open Settings and Automation.
- Each agent has their own calendar. Not a shared or round robin calendar. If someone doesn't have one yet, create it first under Calendars.
- Leads get assigned to agents. Either by hand, or by a round robin step in the workflow that brings leads in.
- An AI that calls or texts your leads. A voice AI like Retell, Vapi, or Synthflow, GoHighLevel's own Voice AI or Conversation AI, or another AI tool. If it's already booking appointments on one calendar, even better.
- About an hour to click through it yourself, or about 15 minutes with Codex.
The fast way: let Codex build it (about 15 minutes)
We recommend building this with Codex, OpenAI's AI agent. You describe what you want in plain English, and it does the setup work in your account while you watch and approve each change. On the open mic, Mike pointed out that we'd already watched Codex build GoHighLevel workflows and webhooks while we sat there, and that this whole setup "is about two workflows." Victoria's take: you could hand it this very guide and it would know exactly what to build.
1. Get Codex
Codex comes with paid ChatGPT plans. Install it from OpenAI's Codex page and sign in with your ChatGPT account.1
2. Create a key for your GoHighLevel account
Codex needs a key to work inside your account. GoHighLevel calls it a Private Integration token.2
- In GoHighLevel, go to Settings, then Private Integrations. If you don't see it, it may need to be turned on in Labs.
- Click Create new Integration. Name it something like "Codex calendar setup."
- When it asks for permissions, allow access to contacts, custom fields, users, calendars, and workflows. Nothing else is needed.
- Click create and copy the token right away. GoHighLevel only shows it once.
3. Paste the prompt and approve each stage
Open Codex, paste the prompt below, and answer its questions: your sub-account ID (it's in
the address bar after /location/ when you're logged in), the token, and which
AI you use. Codex works in stages and stops before each one to show you what it's about to
do. Read it, then type OK.
Some parts of GoHighLevel can't be changed by an outside tool in every account. When that happens, the prompt tells Codex to give you click by click instructions for that step instead, and the manual steps below cover the same ground.
The exact prompt to paste into Codex
You are going to set up "book on the assigned agent's calendar" in my
GoHighLevel sub-account. I am an insurance agency owner, not a developer,
so explain each step in plain English. Work in the stages below. Before
each stage, show me exactly what you will create or change and wait for
me to say OK. Never delete, rename, or turn off anything that already
exists.

ABOUT MY ACCOUNT (I will answer these when you ask):
- My GoHighLevel sub-account (location) ID
- My Private Integration token. Ask me for it when you need it, keep it
  only in this session, and never print it back to me.
- Which AI makes my calls or texts (Retell, Vapi, Synthflow,
  GoHighLevel Voice AI or Conversation AI, or something else)
- The name of the workflow that starts my AI caller, if I have one
- My time zone

STAGE 1: TWO CONTACT FIELDS
Create two contact custom fields, both single line text:
- "Sales Rep"
- "Calendar ID"
If fields with these names already exist, reuse them instead.

STAGE 2: WHO OWNS WHICH CALENDAR
List every user in my sub-account and every calendar, with each
calendar's ID and type. Match each user to the personal calendar that
only they are on. Show me a table: user name, calendar name, calendar ID.
Warn me about any user with no personal calendar, and do not use round
robin or team calendars. Wait for me to confirm the table.

STAGE 3: THE "ASSIGN OR UPDATE CALENDAR ID" WORKFLOW
Build a workflow named "Assign or Update Calendar ID":
- Triggers: Contact Changed, filtered to when the Assigned User changes,
  and Contact Created, for leads that arrive already assigned.
- One If/Else branch per user from Stage 2: "Assigned User is <name>".
- Inside each branch: Update Contact Field "Sales Rep" to that user's
  name, then Update Contact Field "Calendar ID" to that user's
  calendar ID.
- In the "None" branch: add the tag calendar-id-missing.
- Turn on "Allow re-entry" so it runs again every time a lead is
  reassigned.
If you cannot create workflows in my account, give me numbered,
click by click instructions for this stage instead, using the exact
button names I will see, and wait while I do it.

STAGE 4: SEND THE FIELDS TO MY AI
Open the workflow that starts my AI caller and find its Webhook step
(or the step that starts my AI). Keep everything already there and add
these custom data items:
- calendar_id = the contact's Calendar ID custom field
- sales_rep = the contact's Sales Rep custom field
- contact_id = Contact ID
- first_name = Contact First Name
Again, if you cannot edit it directly, give me click by click steps.

STAGE 5: TEACH MY AI TO USE THE CALENDAR ID
In my AI tool, make calendar_id, sales_rep, contact_id and first_name
available to the agent, then add this block to the very top of its
prompt, above everything else, without changing the rest:

  Always check the current date and time first. Before you offer any
  appointment time, check open times on calendar {{calendar_id}}, and
  only offer times that came back open. Book the appointment on
  {{calendar_id}} for contact {{contact_id}}. The appointment is with
  {{sales_rep}}. Never read these values out loud.

Then make sure the agent's "check availability" and "book appointment"
tools use {{calendar_id}}, not a calendar picked from a list. Tell me
exactly where you changed this, or what I need to click.

STAGE 6: FILL IN MY EXISTING CONTACTS
Count the contacts that have an assigned user but an empty Calendar ID.
Tell me the number, then add them to the "Assign or Update Calendar ID"
workflow in small batches.

STAGE 7: TEST
Create a test contact named "Test Calendar Routing" with my phone number.
Assign it to one agent and confirm both fields filled in. Reassign it to
a second agent and confirm both fields changed. Then tell me how to
trigger my AI so I can check the appointment lands on the second
agent's calendar. Afterward, delete the test appointment and the test
contact.

FINISH with a short summary: everything you created or changed, and
anything I still need to do by hand.
When Codex finishes, skip ahead to Step 7 and run the test yourself. It takes two minutes and it's the only way to know for sure.
Prefer to click through it yourself? Start here
These are the same seven steps Codex follows, written for GoHighLevel's screens. Do them in order. Each step ends with a check so you know it worked before you move on.
Step 1: add two fields to your contacts
These are two new boxes on every contact record. One holds the agent's name, the other holds that agent's calendar ID.
- In GoHighLevel, go to Settings, then Custom Fields.
- Click Add Field, choose Single Line, name it Sales Rep, and save.
- Click Add Field again, choose Single Line, name it Calendar ID, and save.
You'll know it worked when
You open any contact and see two empty fields named Sales Rep and Calendar ID.
Step 2: write down each agent's calendar ID
Every calendar in GoHighLevel has an ID, a string of letters and numbers like
8Y3utMIIAKf1OmpX3Pot. The easy place to find it is the calendar's booking link.
- Go to Calendars, then Calendar Settings.
- Find the first agent's personal calendar and copy its booking link.
- Paste the link somewhere you can see it. The part after
/widget/booking/at the end is the calendar ID. - Write it down next to the agent's name. Repeat for every agent.
We checked this on our own account: our strategy call link ends in
8Y3utMIIAKf1OmpX3Pot, and GoHighLevel lists that same string as the calendar's
ID.3 You end up with a short list like this:
| Agent | Calendar ID |
|---|---|
| Victoria Cabrera | her calendar's ID |
| Mike Moore | his calendar's ID |
| Your next agent | their calendar's ID |
This is the only manual part, and "you only have to do that one time," as Victoria put it. Add a row when you hire someone. Change a row only if an agent switches calendars.
Personal calendars only
A round robin or team calendar spreads bookings across people, which is exactly what you're trying to avoid. Each row needs a calendar that only that agent is on.
Step 3: build the workflow that fills the fields
This workflow is the heart of the setup. Whenever a lead gets assigned to an agent, it writes that agent's name and calendar ID onto the contact. Victoria calls hers "Assign or Update Calendar ID."
- Go to Automation, then Workflows, and click Create Workflow. Choose Start from scratch.
- Rename it Assign or Update Calendar ID.
- Click Add New Trigger, choose Contact Changed, and add a filter so it only fires when the Assigned User changes.
- Add a second trigger, Contact Created, so leads that arrive already assigned get filled in too.
- Click the plus sign under the triggers and add an If/Else action. Make one branch per agent, with the condition Assigned User is that agent.
- Inside each branch, add an Update Contact Field action: set Sales Rep to that agent's name. Add a second Update Contact Field: set Calendar ID to that agent's ID from your list.
- In the None branch, add an Add Tag action with the tag
calendar-id-missing. If you ever see that tag on a contact, someone got a lead before you added them to the workflow. - Open the workflow's Settings tab and turn on Allow re-entry, so it runs again every time a lead is reassigned.
- Save and Publish.
You'll know it worked when
You assign any contact to an agent, refresh it, and see Sales Rep and Calendar ID filled in with that agent's details.
Step 4: send the fields to your AI
Your AI can only use the calendar ID if it's handed over when the AI starts. In Victoria's setup, the AI caller is started by a Webhook step in a GoHighLevel workflow. "Think of this webhook as it just triggers the thing that you want to happen," she said. Its Custom Data section is where you list the contact details the AI receives.
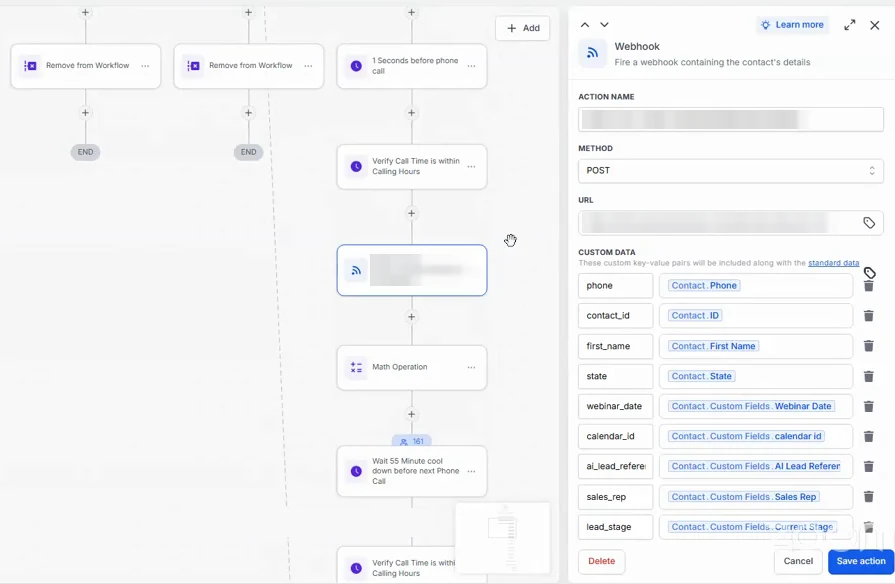
calendar_id and sales_rep in the Custom Data list. We blurred the webhook address and the agent ID.- Open the workflow that starts your AI and click the Webhook step (or whichever step starts your AI).
- Under Custom Data, click Add another item. Type
calendar_idon the left. On the right, click the tag icon and choose Contact, then Custom Fields, then Calendar ID. - Add another item:
sales_repon the left, and the contact's Sales Rep field on the right. - If they aren't there already, add
contact_id(Contact ID) andfirst_name(Contact First Name). - Click Save action, then save the workflow.
If your AI is GoHighLevel's own Voice AI or Conversation AI, there's no webhook to edit. The AI can read the contact's fields directly, so move on to Step 5.
Step 5: tell your AI to use the calendar ID
Now the AI has the calendar ID, but it has to be told to use it. Victoria's rule, learned the hard way: put this information at the very top of the AI's instructions, before the script. What the AI reads first shapes everything after it.
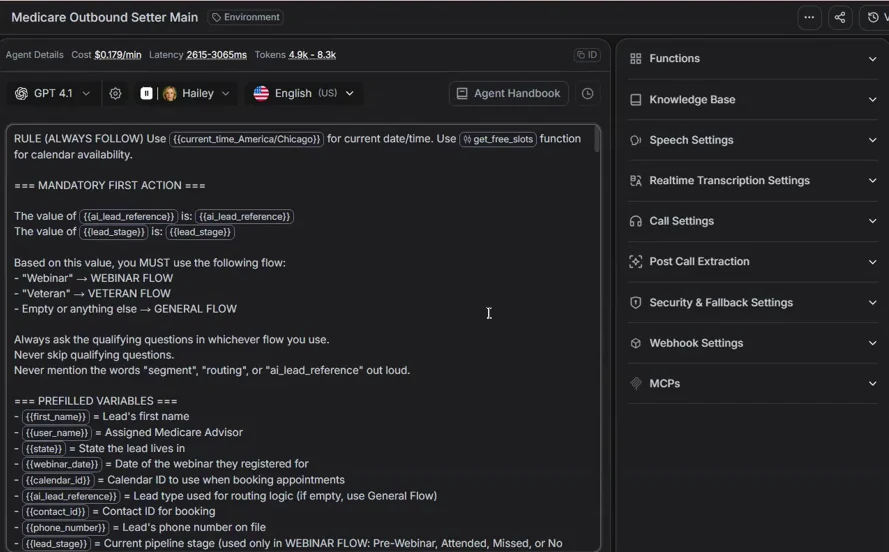
- Open your AI agent's settings and find its main prompt or instructions box.
- Click at the very top, before anything else, and paste the block below.
- Find the agent's booking or calendar setting. Where it asks which calendar to book on, choose the
{{calendar_id}}value instead of picking a calendar from the list. The exact spot is different in every AI tool. - Save the agent.
Always check the current date and time first.

Before you offer any appointment time, check open times on
calendar {{calendar_id}}. Only offer times that came back open.

Book the appointment on {{calendar_id}} for contact {{contact_id}}.
The appointment is with {{sales_rep}}.

Never read these values out loud.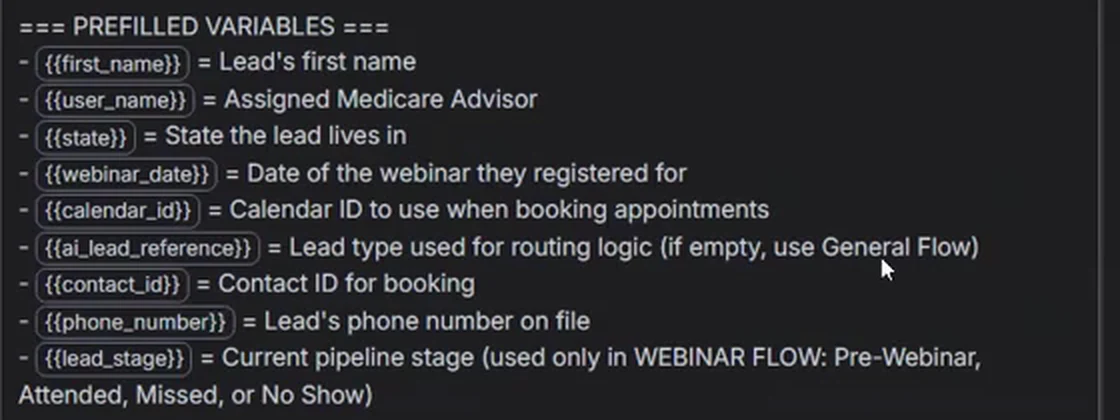
If your AI tool only lets you pick a calendar from a list and won't accept
{{calendar_id}}, that one setting is the job to hand to Codex or your tech
person. The section at the end tells them exactly what to wire up.
Step 6: fill in the contacts you already have
Contacts assigned before today have empty fields, because the workflow didn't exist yet. Run them all through it once.
- Go to Contacts and filter to contacts where Assigned User is not empty.
- Select them all, open Bulk Actions, and choose Add to Workflow.
- Pick Assign or Update Calendar ID and confirm.
You'll know it worked when
You open a few older contacts and see Sales Rep and Calendar ID filled in.
Step 7: test it with a fake lead
- Create a contact named Test Calendar Routing with your own phone number.
- Assign it to one agent. Refresh and check that both fields show that agent.
- Reassign it to a different agent. Refresh and check that both fields changed.
- Trigger your AI for that contact and book a time.
- Open the second agent's calendar. The appointment should be there.
- Delete the test appointment and the test contact.
If all six check out, you're done.
What happens when you reassign a lead
This is where the setup pays for itself. Say an agent isn't working their leads and you move them to someone else, one at a time or all at once. "Because that username changed, two things are going to happen," Victoria said. Sales Rep switches to the new agent, and their calendar ID replaces the old one. The next time the AI calls, it books with the new owner. You don't touch the AI at all.
It handles handoffs the same way. When a lead becomes a client and you reassign them to a customer care rep, the workflow writes the customer care calendar onto the contact, and any AI follow up books there instead.
After your first bulk reassignment
Open two or three of the moved contacts and confirm both fields changed. If they didn't, select the moved contacts and use Bulk Actions, Add to Workflow, like in Step 6.
Bonus: one AI caller for every lead type
The same trick fixes a second headache. Plenty of agencies build a separate AI caller for webinar leads, veteran leads, and Medicare supplement leads. Victoria builds one. A contact field holds the lead type, and the first line of the AI's instructions says which script to use for each type.
"Everything else is the same. The appointment booking is the same. The only thing that changed was the thing that we would say." A supplement lead hears about lowering their Plan G premium instead of "it looks like you're a veteran," which is how you lose a call in the first five seconds. You maintain one AI and get the right opening line for every lead.
Mistakes that break it
- Using a team or round robin calendar. It spreads bookings across people. Use each agent's personal calendar.
- Skipping the Contact Changed trigger. Reassigned leads keep the old agent's calendar.
- Leaving Allow re-entry off. The workflow runs once per contact and never updates again.
- Skipping Step 6. Older contacts have an empty Calendar ID, so the AI has nowhere to book.
- A calendar still picked in the AI's booking settings. If the booking setting points at one calendar, every appointment lands there no matter what the contact says.
- Putting the calendar instructions at the bottom. Put them at the top so the AI checks open times before it offers any.
- Sharing the webhook address or the Codex token. Blur them in screenshots, and delete the Private Integration when you're done.
For your tech person: what's under the hood
You can skip this section. It's here so whoever maintains your systems can wire up the one piece some AI tools need.
- Booking against a variable calendar. The agent needs two tools that take
the calendar ID as input: GoHighLevel's calendar free slots endpoint and its create
appointment endpoint, which takes calendarId, locationId, contactId and
startTime.45 Wire both to
{{calendar_id}}and{{contact_id}}, with the API token stored in the platform's secrets, not in the prompt. Victoria's Retell agent calls its free slot toolget_free_slots. - Starting the call. Victoria's webhook posts to a self hosted n8n server, which calls Retell's create phone call API and passes the custom data through as the agent's dynamic variables.67
- Why n8n in the middle. When she built it, GoHighLevel's premium workflow actions cost about a cent each. At 25,000 to 50,000 opt-in dials a month that became a $600 to $700 monthly bill on top of roughly 15 to 25 cents a minute for the voice AI and about a cent per dial for phone service. Self hosting n8n on AWS moved the per action work off GoHighLevel, and AWS also fit her HIPAA setup. GoHighLevel's plans have changed since, so check current billing before copying that part.
- Prompt size. Tokens scale with prompt length, so a shorter prompt costs less per minute. Rarely used instructions belong in a knowledge base the agent pulls from when needed.
- Ambrose. If your agents run on Ambrose, the same two fields work as is. We're also testing having Ambrose's contact memory hold the assigned agent and stage, so the agent reads one memory field instead of several.
Questions agents ask about AI booking
How do I make an AI agent book on the right agent's calendar in GoHighLevel?
Give every contact two custom fields, Sales Rep and Calendar ID. A workflow fills both the moment a lead is assigned to an agent. Your AI receives the contact's calendar ID along with the rest of the contact's details and books on that calendar. The AI never chooses between calendars. It reads the one written on the contact.
Do I need to know how to code to set this up?
No. You can click through the seven steps in GoHighLevel yourself in about an hour, or paste one prompt into Codex, OpenAI's AI agent, and approve each change as it builds the setup for you. The only thing you type by hand is each agent's calendar ID, once.
Where do I find a GoHighLevel calendar ID?
Copy the agent's booking link from Calendars, Calendar Settings. The long string of letters and numbers after /widget/booking/ at the end of the link is the calendar ID. Give each agent their own personal calendar so there is one ID per person.
What happens when I reassign a lead to a different agent?
The workflow runs again and overwrites both fields with the new agent's name and calendar ID. The next time the AI calls or texts that contact, it books with the new owner. It works for one contact, a bulk reassignment, or handing a new client to customer care.
Does this work with Retell, Vapi, Synthflow, or GoHighLevel's own AI?
Yes. Any AI that can receive contact fields and book on a calendar you give it can use this setup. Victoria Cabrera has run it with Retell voice agents and with several text based AI tools. Salesforce and HubSpot users can apply the same idea with their own custom fields.
Sources
- OpenAI. Codex documentation. Verified live 2026-09-28. developers.openai.com/codex.
- HighLevel Support. "Private Integrations: Everything you need to know": create a new integration, choose scopes, and copy the token, which can't be viewed again later. Verified live 2026-09-28. help.gohighlevel.com.
- Strategic AI Architects. GoHighLevel calendars API, GET /calendars/ for our own sub-account, run 2026-09-28: the calendar whose booking link ends in /widget/booking/8Y3utMIIAKf1OmpX3Pot returns id "8Y3utMIIAKf1OmpX3Pot", calendarType "personal".
- HighLevel. API documentation, Calendars, "Get Free Slots." Verified live 2026-09-28. marketplace.gohighlevel.com.
- HighLevel. API documentation, Calendars, "Create Appointment." Verified live 2026-09-28. marketplace.gohighlevel.com.
- Retell AI. API reference, "Create Phone Call." Verified live 2026-09-28. docs.retellai.com.
- Retell AI. "Dynamic Variables." Verified live 2026-09-28. docs.retellai.com.
- Tech Savvy Insurance Friday open mic, September 25, 2026, with Victoria Cabrera and Mike Moore. All quotes and screenshots come from that recording. Webhook addresses, agent IDs and account IDs are blurred. techsavvyinsurance.com.
Want it set up for you?
Tell us how your leads get assigned today and we'll map the fields, the workflow, and the booking with you.
Related reading: Build a conversational AI for one pipeline · What voice AI really costs an insurance agency · TCPA rules for AI follow up